360 lace wigs can add fullness and celebrity-style glamor to your natural hair. They come in different styles, lengths, textures, and colors.
Usually, these wigs have a lace that goes around the entire perimeter of the wig. Their cap construction allows you to style freely and create a natural hairline. What’s more, you do not have to worry about your tracks exposing or edges showing.
Below, we made a simple guide to help you learn about a 360 lace wig. The guide also includes instructions on how to make and install it.
Let’s begin!
What Is A 360 Lace Wig?
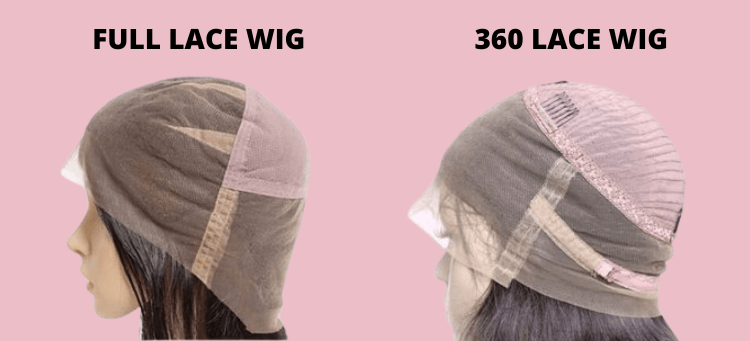
A 360 lace wig, also called 360 wigs or 360 frontal wigs, is primarily a lace frontal with bundles attached. The lace frontal goes around the entire perimeter of the wig. In simple terms, the lace forms a complete 360 circle along the hairline.
Typically, the wig has 4” lace in front and 2” lace at the back. The hair on this lace is individually hand-knotted to give an illusion of natural hair growth.

The middle part of the 360 lace wig is a breathable cap that bonds with the edge of the lace. The hair in the middle is machine-made and sewn onto the cap to give fuller hair at the crown.
Furthermore, 360 wigs have pre-sewn clips and adjustable straps to keep them in place. And depending on your preference, you can install them with or without wig glues.
Difference Between 360 Lace and Full Lace Wigs
360 lace wigs have a complete 360 circle of lace that runs around the hairline. The hair on the lace is individually hand-knotted, which is why you can only part the hair along the lace area.
Meanwhile, full lace wigs have a base entirely made of lace. The hair on the whole lace is hand-knotted, and you can part it anywhere you want.
Since the entire lace is hand-knotted, the full lace wig incurs more labor costs. As a result, it is more expensive than a 360 lace wig.

The Advantages of 360 Lace Wigs
360 lace wigs not only change up your hairstyle but also have many other benefits. Here are some advantages of these wigs.
Versatility
A 360 lace wig hair is hand-knotted, allowing for free parting in various directions. On top of that, it has a wider parting area, thus offering the versatility to style in many ways.
The cap construction allows for styles like ponytails, buns, or French braids.
You can even create half up half down hairstyles depending on what you want. Moreover, whichever style you create, your tracks will not expose.
Natural
360 lace wigs are usually made of quality Remy hair, which provides a more natural look. Also, you can customize them by creating bleached knots and baby hair along the hairline. This will make the perimeter look more like the scalp.
Furthermore, 360 lace wigs usually look more realistic than lace frontals as the lace goes around the entire head. Even with an updo hairstyle, the hair at the back will still appear to be growing from the scalp.

Comfortable
The 360 lace wig provides more breathability for a comfortable wearing experience. This is because it has more lace space than a lace frontal, T-part wig, and U-part wig.
On top of that, it has a breathable cap in the middle to allow for more ventilation.
The wefts also have open spaces between them, making the hair less dense. Therefore, you can wear your wig for an extended period without discomfort.

Affordable
360 lace wigs are more affordable compared with full lace wigs. They have a smaller lace surface area with lower hair density, thus, incurring low labor costs.
A 360 lace wig should cost anywhere between $50 – $200. Remember that the price may vary depending on wig length, type, and lace material.
How to Install a 360 Lace Wig for Beginners
The installation of a 360 lace wig is not as complicated as it sounds. Before wearing the wig, ensure you braid the hair into cornrows. Then apply oil to prevent the hair from drying out.
Here is an easy-to-follow procedure on how to install a 360 lace wig.
Step 1: Wear the Bald Cap
Put on the bald cap and apply a foundation shade similar to your skin tone. Then use a holding spray to adhere it down and dry the edge using a blow dryer on a cold or warm heat setting.
Step 2: Trim the Cap
Next, trim its excess edges off and re-apply the foundation along the edges of the cap.
Step 3: Install the Wig
Put on the wig and align the lace along your natural hairline. Now apply the holding spray below the lace to hold the lace down.

Step 4: Blend the Lace
Cut off the excess lace along the hairline and again apply holding spray. Then apply foundation along the edges for a seamless blend.
Step 5: Create Baby Hair
Part in small sections along the edge of the wig, then cut the hair using a sharp pair of scissors. Then use an edge control brush and styling gel to curve baby hairs along your hairline.
How to Make a 360 Lace Wig
Making a 360 lace wig requires patience, as it may take time. You will need a canvas head, thread, a C-shape needle, bundles of hair, T-pins, 360 lace, and a breathable wig cap.
Here is a simple tutorial on how to make a 360 lace wig
Step 1: Put the wig cap on the canvas head and place the 360 lace over it. Align the wig’s hairline about an inch in front of the wig cap lining.
Step 2: Fold the inner edges of the 360 lace and pin them down using T-pins
Step 3: Stitch the inner lining of the lace to the wig cap. After that, sew in the hair wefts on the wig cap from left to right.
Step 4: Tweeze the hairline to make the wig look realistic, and add an elastic strap at the back for added security.
Note: I recommend using a wig cap whose shade matches the general tone of your scalp for a more realistic look.

FAQs About 360 Lace Wigs
Full Lace or 360 Wig, Which One Should You Buy?
Buying a full lace or a 360 wig depends on personal preference. Before making your purchase, consider your budget and the wig’s features. If you are looking for a more affordable alternative, the 360 lace wig will be a good option.
However, a full lace wig will be a good choice if you want greater versatility in styling. You can part the wig from anywhere, unlike the 360 lace wig, which you can only part along the head’s perimeter.
How to Sew in a 360 Lace Frontal?
Begin by braiding down the hair and wear a wig cap to keep your hair flat under the wig. Then put on the 360 lace frontal and align it ½ an inch from your natural hairline. Now cut off the excess lace along the hairline.
Next, part the hair on one side, above the temple, and sew the lace on the braid that is underneath. After finishing, sew the other side of the head, then apply a holding spray along the hairline. Finally, sew down the middle part of the lace and install the hair bundle.
How Long Does A 360 Lace Wig Last?
Usually, 360 lace wigs can last 6 months to more than a year with proper treatment and care. But you can make it last even longer by using a gentle installation technique.
Mostly, people prefer to use liquid adhesives rather than tapes. This is because tapes can stretch the delicate lace material during removal.
Final Thoughts
Now, you almost know everything about 360 lace wigs. And if you want to try it, you can buy a 360 lace wig from these online wig stores.


