I-Tip hair extensions are pretty popular in the hair extensions world. Like other hair extensions, they can help with short or damaged hair or enhance your overall appearance.
But are I-Tips the hair extensions you need? Let’s find out by understanding what they are, their benefits, and the drawbacks. We’ll also discuss the installation process and the maintenance requirements. Let’s go!
What Are I-Tip Hair Extensions?
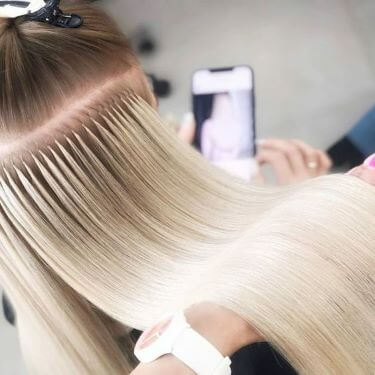
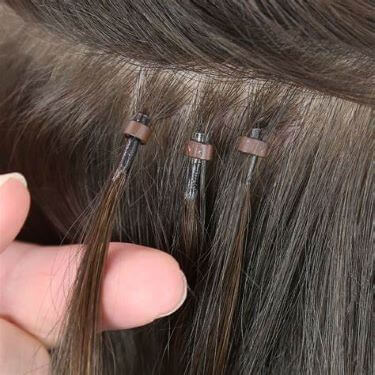
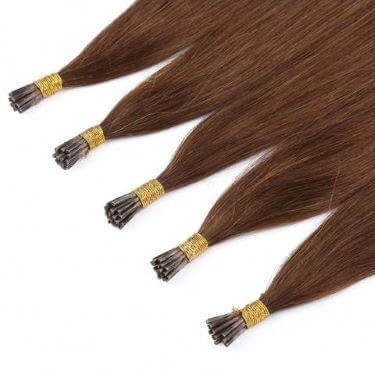
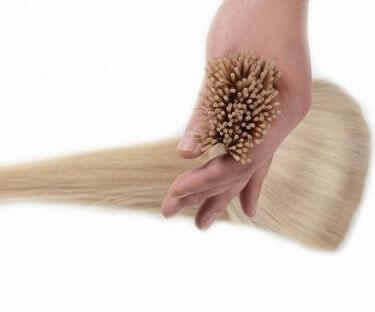
I-Tip extensions, otherwise known as micro-rings, micro-beads, or pro-tips, are strands of hair that are attached to your natural hair using small beads or metal rings. Unlike most hair extensions, I-Tips attach to your hair strand by strand rather than in broad wefts.
Each I-Tip extension comes with a keratin tip that clamps to your hair using micro-beads. This installation (cold fusion) needs neither heat nor chemicals, making it a safe method for natural hair.
I-Tip extensions are popular for their nature and effect on hair. They blend smoothly with your hair to give a more realistic appearance and can be worn for weeks thanks to their secure attachment.
Benefits of I-Tip Hair Extensions
Every design of hair extension has its benefits. Below are some of the reasons why I-Tip extensions are popular:
1. Realistic Hair Movement
Whether long or short, I-Tip extensions smoothly integrate with your natural hair to give a realistic hair movement with every sway. The strand-by-strand installation also makes I-Tips pretty comfortable to wear.
2. Styling Flexibility
I-Tips extensions are quite popular for their flexibility. You can play around with the strands, try different colors, etc., to create a style that matches your needs. They are also available in varying lengths and textures to accommodate various hair types.
3. They Are Durable and Reusable
I-Tips extensions could be what you are looking for if you are in the market for a long-lasting hair extension. They are semi-permanent so you can wear them for months without major adjustments.
With proper maintenance, your I-Tip extensions can last for 3 to 9 months, and if you wish, you can reuse them.
4. Less Hair Damage
Hair damage is a major concern when it comes to hair extensions. Luckily, I-Tip extensions offer a gentle solution for your natural hair.
First, the strands and micro-beads are light, which means your hair is not subjected to stress and breakage. This is particularly important for those with thinner hair strands.
Second, there is no heat or chemicals needed during installation. Your hair is safe from risks associated with such methods.
5. Hidden Tips
It’s almost impossible to detect the blending between your natural hair and the extensions. If you don’t want them to be seen at all, then get the beads that match your hair color.
6. Quick and Easy to Remove
Removing I-Tips is quite easy. When you finally decide to detach them, apply pressure on the beads or rings using pliers. The tips will slide down when the beads enlarge. Quite easy, right?
Drawbacks of I-Tip Hair Extensions
I-Tips extensions offer a convenient and flexible styling option. However, they do come with a few disadvantages, including:
1. Complicated Installation Process
Installing I-Tip extensions is no kid stuff. The process requires special installation tools like micro-beads, threading and clamp tools. Even if you are willing to buy them, you’d still have to learn how to use them to avoid damaging your hair.
Second, attaching the extensions strand by strand is time-consuming. Depending on your skill level and the strands to attach, installing I-Tip extensions can last for 3 to 5 hours.
2. Installation and Maintenance Cost
I-Tip hair extensions can cost between $300 to $1000, depending on your location and the extension design. I-Tips installations are affected by the same factors and can cost between $200 to $500. This totals to about $500 to $2,000 for installation.
As for maintenance, the occasional visits to your hairdresser for re-adjustments can cost between $125 to $500. Factors such as hair volume, length and styling can also impact the overall costs.
3. Maintenance Requirements
I-Tip extensions demand regular maintenance, just like other hair extensions. The extensions must be adjusted regularly to keep them undetectable as your hair continues to grow.
Your washing and brushing habits also have to change. You’ll need to be gentle when washing your hair; otherwise, you risk damaging the beads or pulling the whole extension. The same applies to brushing; brush from the ends going up to avoid pulling the extensions.
4. Not Suitable for Thin Hair
Even though I-Tip extensions are flexible, individuals with extremely thin or fine hair should proceed with caution. The additional weight of the extensions can cause stress, resulting in hair breakage.
5. Discomfort After Installation
First-timers may feel some discomfort caused by the constant tension immediately after installation. You may feel slight headaches in the first few days, but it usually wears off as you get used to extensions.
How To Install I-Tip Hair Extensions
We always recommend seeking professional assistance, but if you’re up for the challenge, here is a detailed installation guide for installing I-Tip hair extensions.
Preparation
To get the best I-Tip installation experience and results:
- Brush the hair to detangle and remove product build-up
- Clean the hair at least twice using a clarifying shampoo, then rinse to remove shampoo residues
- Ensure the hair is dry
- Thread your micro-beads onto your threader/loop tool in advance to avoid the occasional stops
Tools Needed
- I-Tip Hair Extensions
- Micro-beads
- Clamp tool
- Threading or loop tool
- Sectioning Clips
- Flyaway strips
Steps For Installing I-Tip Hair Extensions
When all the preparations are complete, and you have assembled all the tools:
Step 1: Part Your Hair
Start by partitioning the hair into sections and securing each with a sectioning clip. Manage stray hairs using the flyaway strip for a clear surface.
Step 2: Thread Hair Through Micro-Bead
Next, thread about 1cm of the natural hair through the micro-beads using the loop tool.
Step 3: Attach an I-Tip Extension
Now, place an I-Tip hair extension between your natural hair and the micro-bead.
Step 4: Secure the Micro-Bead
Push the micro-bead close to the scalp, then clamp it shut. Ensure it’s not too close, as this would cause tightness and discomfort.
Repeat steps 2-5 for the remaining areas and sections.
I-Tip Hair Extensions Maintenance Tips
I-Tip hair extensions offer a stylish, flexible and long-lasting solution. However, their longevity and appearance heavily depend on how well you maintain them.
1. Proper Brushing
Use a soft-bristled or wide-tooth brush (if your hair is wet) to brush your hair at least twice a day to prevent tangling. Remember to start from the ends, moving up to avoid pulling the extensions and scratching the beads.
2. Washing and Conditioning
Be gentle when washing your hair to avoid loosening the micro-beads or pulling the whole strand. To avoid tangling when washing, use cold water as it keeps the hair cuticles closed.
Moreover, use sulfate-free shampoo and avoid products that contain protein or silicone. They can weaken the bonds in your I-Tip extensions.
3. Heat Styling
Avoid using too much heat while styling your I-Tip extensions. Maintain the temperatures at 300°F or less to prevent damage to the extensions. You can also apply heat-protectant products for added heat protection.
4. Regular Maintenance Appointments
As mentioned earlier, your I-Tip extensions will become more and more visible as your hair continues to grow. Regularly go for re-adjustments to maintain the natural hair look you desire.
5. Proper Storage
Remember, I-Tip extensions are reusable, but only if they are well maintained. If you plan on reusing your extensions, ensure they are cleaned and dried to improve their durability.
How to Remove I-Tip Hair Extensions
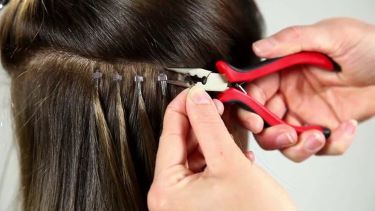
Removing I-Tip extensions is pretty easy and does not require visiting your hairdresser. If you have the time, you can easily do this at home. Here’s how:
Tools Needed
- Pliers or tweezers
- A comb
- Sectioning clips
Steps for Removing I-Tip Hair Extensions
Follow the steps below to remove your I-Tip hair extensions.
Step 1: Separate The Hair Extensions
Begin by separating the hair section where you attached the extensions. Secure the other sections with clips to get a clear surface.
Step 2: Squeeze the Micro-Bead
Next, pick an extension then use the pliers to gently squeeze the flattened edges of the micro-bead holding it.
Step 3: Remove I-Tip Extension
Next, hold the micro-ring with one hand and slowly pull the I-Tip extension with the other hand. Squeeze the micro-bead again if you’re struggling to remove the extension.
Step 4: Remove Micro-Bead
Lastly, remove the micro-bead from your natural hair and comb if there are knots present. After that, repeat steps 2-4 until you finish removing all the I-Tip extensions.
Frequently Asked Questions About I-Tip Hair Extensions
1. How Much Do I-Tips Hair Extensions Cost?
I-Tip hair extensions generally cost between $300 to $1000. The actual price, however, depends on factors such as hair quality, length and design. Research on the internet or consult your hairdresser for accurate and personalized advice.
2. What Is the Difference Between Keratin Tip and I-Tip Extensions?
Keratin tip extensions and I-Tip extensions are similar except for the installation method. Keratin tip extensions require heat to attach to natural hair (hot fusion), while I-Tip extensions use micro-beads (cold fusion). Both extensions, however, are attached strand by strand.
3. Which One Is Better: I-Tips or K-Tips?
Both I-tips and K-tips come with their own set of advantages. I-Tip extensions are easy to install and remove, more natural-looking and ideal for frequent hairstyle changes. K-Tip extensions, however, are more durable, more secure and require less maintenance.
The decision between the two comes down to your individual preferences and requirements. Research the two extensions and pick the one that suits your style and budget.
Final Thoughts
I-Tip hair extensions provide an exceptional opportunity to style your hair without fretting over its length or texture. Besides their durability, I-Tip extensions are pretty comfortable to wear and blends smoothly with natural hair.
Always check out other designs of hair extensions e.g. K-Tip extensions and see what they have to offer. If you are already convinced by I-Tips, get some installed with the help of an experienced hairdresser.


