There are several types of hair extensions, one being the quick weave. Nowadays, it’s becoming more popular among women than other weave kinds.
I’ve seen strange women’s experiences with weaves, and the majority claimed how painful they are. In my understanding, I deciphered they must have been criticizing sew-ins and knew little about weaves generally.
To clear the air, I thought it best to clarify much about quick weaves. They’re the more convenient and comfortable weave option.
This article will answer the question: What is a quick weave? We’ll also share about its good and dark sides and more.
Stay tuned!
What Is A Quick Weave?
A quick weave is ideally the simpler, quicker, and more protective version of sew-in weaves. This hair technique involves using glue to attach extension wefts to a wig cap. Instead of fixing the wefts directly to your hair, the wig cap is the barrier put in use with quick weaves.
Full protection may incorporate applying a protective gel over the wig cap before sticking the wefts. And like sew-ins, a quick weave needs braiding the hair down into cornrows. But it’s more like the alternative to sew-ins.
The existence of this impressive style has always been one for the books. All thanks to Christina Jenkins’ weaving invention in the 1950s from her own experience and enthusiasm for the hair industry. [1]
How Different are Quick Weaves from Sew-ins?
Since quick weaves are an evolution of sew-in hair extensions, it’s good to get their differences to avoid confusion. One thing for a fact, their method of installation is what distinguishes them.
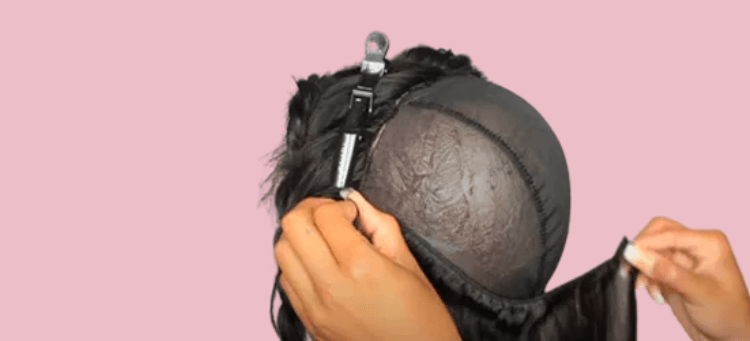
While sew-ins use thread to fasten the wefts of hair into cornrows, quick weaves require wig glues and a protective cap. The wefts are bonded onto the wig cap worn with glue.
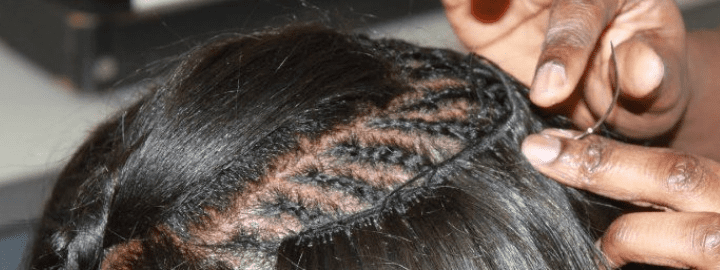
As such, the gluing process limits tugging, which sew-ins, on the other hand, do not. The sewing process creates tension because it’s directly on your natural hair. And this is where it’s very much distinct from quick weaves.
That’s just a taste of the benefits of quick weaves, as there’s more disclosed ahead. But like sew-ins, they also have their downsides.
The Pros of Wearing Quick Weaves
Quick weaves have plenty of benefits when you have them on. This section outlines all the positive things you accrue when you decide to get a quick weave.
Convenient
First things first, the quick weave is the most convenient weaving method. You will realize that it gives you an easier time all-round than most styles. As long as the sticking onto the cap is flawless, you’re always good to go.
Its installation takes 1 ½ hour, more than half the time it takes to install sew-ins and fusion extensions. And its removal cannot take more than 15 minutes of your day’s schedule. If you’re a busy bee, you’re sure not to have your day wasted over a quick weave.

Less Tension
A quick weave gives quite a similar feel to a wig with the protective cap in use. In its installation, you will not need to manipulate the fix with something pulling like thread or clips. Therefore, your hair and scalp will be completely safe from tension, unlike sew-ins and other hair extensions.
The wear will be comfortable and relaxing from the first day. You will not experience headaches or fatigue when it’s being fixed.

Protective
Going for quick weaves is going for a style that encompasses little tugging, pulling, and manipulation. This style keeps all the ends of your hair tucked in for weeks.
As that happens, you’ll barely touch your hair, often trying to make a killer look out of it. Hence your hair will grow in peace without any disturbance whatsoever.
Affordable
The full cost of setting up quick weaves, whether by yourself or at the salon, is inexpensive. You can part with only $30 -$150 compared to sew-ins that are more costly yet less protective.
The low expenditure is partly because the installation is little work for a hairstylist. Also, it’s not time-consuming, so the price remains fairly cheap and manageable for any lady.

DIY Installation
Since the quick weave makeup comprises extension wefts, it’s feasible to fix them on your own if you’re good at using glue. A quick weave doesn’t have to be installed by a hair technician.
The inclusion of extension wefts also gives the freedom to tweak them to your favorite color or length. You can choose to look modern by creating babylights or highlights yourself.

The Cons of Wearing Quick Weaves
Having the cons too beforehand helps you understand what you’re getting yourself into when you wear a quick weave. That way, you automatically define a new level of care and vigilance in preparation to maneuver around them.
Hair Loss
Quick weaves involving glue and adhesive removers mean it’s you risking getting chemicals onto your head. You might use glue to clamp down the wig cap at its edges so as not to fall off. So, the glue will contact your natural hair.
If you accidentally pull the glue, it will come off together with your hair. Also, if you use a low-quality weave cap, the glue and protective gel will penetrate into your hair. The gel may cause hair dryness and breakage and is not entirely protective if it gets onto your hair.
Short Longevity
Women looking to reduce their visits to hair salons if they do not DIY cannot with quick weaves. They can wear them for 4 to 5 weeks at most. The glue cannot stay put for a longer period.
Additionally, the cornrows beneath wear out fast; once they loosen up, you’ll have to get the quick weave out. Unless you do not mind wearing a loose weave over your head. But for the better, you’ll have to because of the glue factor.
Waste-generating
Every installation will make you cut long extension wefts. That’s to attain an exact fit from one end of the wig cap to another.
When shortening, you might find yourself left with small pieces which you cannot fix anywhere since they’re overly short. On top of that, the use of scissors will lead to some hair shedding, especially when creating bob cuts. All these end up being wastes you can only throw away since they’ll no longer be of use in any way.

How to Put on a Quick Weave
In quick weave installations, teach yourself to stick to this important rule of thumb. Prefer installation by a weaving technician you trust since it involves adhesive and cutting.
Conversely, you can do it yourself only if you’re a self-made expert. That’s when you highly esteem your vigilance and amount of skill in the same. The following outlines the products needed and the DIY procedure for a meticulous installation.
What You’ll Need
- Hair extension wefts
- Protective wig cap
- Glue protector
- Hair glue
- Hair dye brush
- Rat tail comb
- Blow-dryer
- Hair straightener
Installation Steps
After checking you have all the above products, next is to start your installation. First, prep your hair by braiding it down to make it ready. And keep leave-outs in mind if you want a part hairstyle, laid baby hairs, or ponytails.
Step 1: Wear the protective cap over your braided hair. Remember to mark with a white pen the region to be cut out at the end.
Step 2: Apply your glue protector on the cap in streaks and spread it using the hair dye brush. Further, blow-dry over the glue protector.
Step 3: Take your extensions individually and apply the hair glue to the weft area. Then stick them onto the cap, starting from the back, and side to side. Stick them closely if you want a fuller look.
Step 4: On reaching halfway towards the front, start placing the extensions in a U-shape manner. That’s from one front to the mid-back and the other front.
Step 5: After sticking, cut out the excess of the wig cap. Stick down the cap edges using hair glue. And finally, unbraid the leave-outs and straighten them out to blend with the weave.
How to Properly Take out a Quick Weave
Removing a quick weave is similarly easy and takes less time than installing it. However, it requires more care and gentleness, or you risk losing your natural hair. You can remove it with a conditioner or a glue remover, as described below.
Using Conditioner
If a conditioner suits you best, let these three steps guide you.
Step 1: Clip the leave out, whether at the middle or side part, to prevent it from interfering with removal.
Step 2: Place your head under a running tap with warm water. And apply conditioner from the back towards the front as you massage it into the extensions and the cap. Do not pull where the glue has not unstuck itself.
Step 3: Lift the cap where it’s already detached until it’s all out of your head. After that, separate the extensions from the cap, unbraid your natural hair, and co-wash everything.
Using a Glue Remover
As for glue remover, this is the safest way to use it for quick weave removal.
Step 1: Separate the leave-out from the rest of the hair using a jaw clip.
Step 2: Press out the glue remover from its can to fall along the attachment at the front. Basically, start from the front, where it’s most visible, as you move towards the back.
Step 3: Gently rub in the glue remover for the cap and the extensions to loosen up. At places where the extensions are stubborn to remove, saturate them with more glue remover. Never force a detachment not to rip your real hair off.
Top 5 Cutest Quick Weave Hairstyles
Usually, a quick weave doesn’t have to remain straight or in its original packaged condition. You can manipulate it into other hairstyles for a more attractive appearance since this weave is diversely versatile.
Here is where creativity may come in if you’re an artsy person. But if you need simple beginner-friendly ideas, we got you.
1. High Ponytail

Number one on our list is the high ponytail for long quick weaves. It’s one of the sassiest hairstyles that are quick to create and shows the most natural look of your weave.
As you do the entire weave fix, keep about an inch of your hair untucked around the hair perimeter. As part of your installation, this will conceal the weave’s wefts and the cap for the pony to be as high as you want.
2. Low Pigtails

Low pigtails could suffice if you don’t enjoy your quick weave high and would love it held low. Low pigtails will bring out a cool chic style for a run outdoors or a casual picnic.
Simply part down the hair into two equal sections and hold each with bobbles. Or further proceed with braiding them down and tying the ends with extra bobbles for the braid to stay intact. In this case, you’ll have to ensure your wig cap imitates your scalp.
Or you can decide to braid it into a single pigtail, as preference lies with you. This helps avoid the extra work of matching your cap to your scalp.
3. Sleek Middle Part
Middle parts are often worn for a slight change in the hair’s physique. With quick weaves, they’re very easy to make. You only need to create a middle leave-out as you fix the extension wefts.
In your final touches of installing the quick weave, cut out the wig cap at the leave-out area. And straighten your hair to blend with the quick weave while considering the part stays precisely in the middle.
4. Deep Side Part
A part that’s more exquisite and stylish would be the deep side part. It compliments your beautiful facial features like the cheekbones and your facial side-view.
Quite different from the middle part, strive for a slight diagonal at the temple and slightly far from the middle. When creating the part, go deep into the hair mass and stop halfway through your head. Or, to be more precise, part at the forehead about 1 ½ inches from the side.
5. Bob Cut
You may otherwise choose to be extraordinarily sophisticated and modish altogether through a bob cut. In fact, this hairstyle is the best for the warmest weather, particularly summer, since the hair is short. Bob cuts mostly end at the jaw bones or slightly lower but not longer than shoulder-length.
Once you’re done fixing your long quick weave, cut the hair from the back in a slanted manner towards the front. While cutting, aim your cut around the jaw-bone level. The quick weave should be slightly longer at the front and sides than at the back.
FAQs about Quick Weaves
Can you swim with a quick weave?
Yes, you can swim with your quick weave if it’s not in chlorine-treated pools or ocean water. Chlorine and the salty nature will strip the weave of its moisture, leaving it frizzed and weaker. You can apply a swim spray and wear a swim cap before swimming to avoid these undesirable effects.
How do you sleep with a quick weave?
Just wrap the quick weave’s hair in a circle, clipping wherever you can, so the circle won’t undo itself. Then take your headscarf and cover the hair in it. And before the final tight tie, remove all the clips gently, and tuck in any hair that comes outside.
You can opt for a hair bonnet instead of a headscarf. Whatever you choose, ensure it’s made of soft material, especially satin, as your first pick. Cotton tends to create friction that often leads to knots.
Is a quick weave better than a sew-in?
Honey, speaking the truth, the choice boils down to what exactly you’re looking for. If you want a quicker installation and a more affordable option, quick weaves have your back. But if your heart lies with longer longevity of wear, you might have to choose sew-ins over quick weaves.
Can a quick weave help your hair grow?
With proper installation and removal, a quick weave enables your hair to grow faster. It protects your hair against damaging environmental factors such as smoke and sunlight. Apart from that, it minimizes the need for you to play around with your actual hair for growth to continue with ease.
Summing up
With quick weaves, you achieve a pain-free hairstyle right to the last week of wear. Once its duration of 4 or 5 weeks ends, avoid extending it, as your hair will need refreshment.
We hope this article helps throughout your quick weave journey. Let’s also listen to your quick weave experience. If possible, share your tips on quick weaves in the comments below.


