Looking for a braid-free, non-damaging way to add volume to your hair?
Well, here’s where you’ll find the ultimate solution; nothing but braidless sew-in hair extension.
I did extensive online research on braidless sew-ins. And, chose to go the extra mile and combine the research with my hair expertise as a hair professional.
So this time, this article will walk you through everything about braidless sew-in. And how it’s an ideal way to avoid braids while still looking attractive with hair extensions.
I’ll reveal the pros and cons to you and how to install and maintain them for long-term service.
Stay tuned!
What is a Braidless Sew-in?
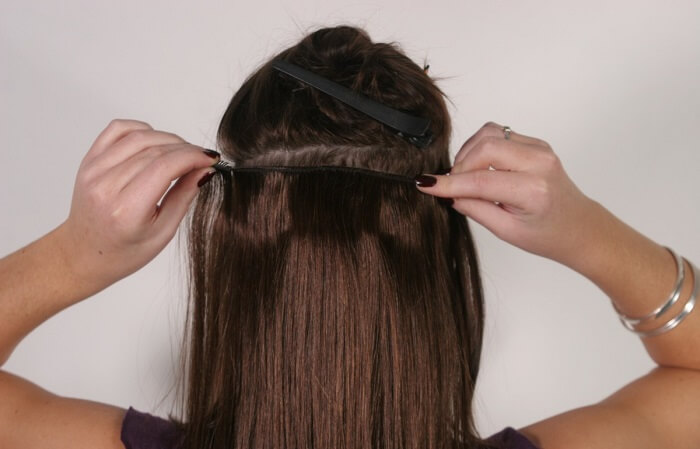
Braidless sew-in is an installation method (detailed tutorials below) that involves sewing the extensions to the natural hair. That’s without braiding having braids at the hair base.
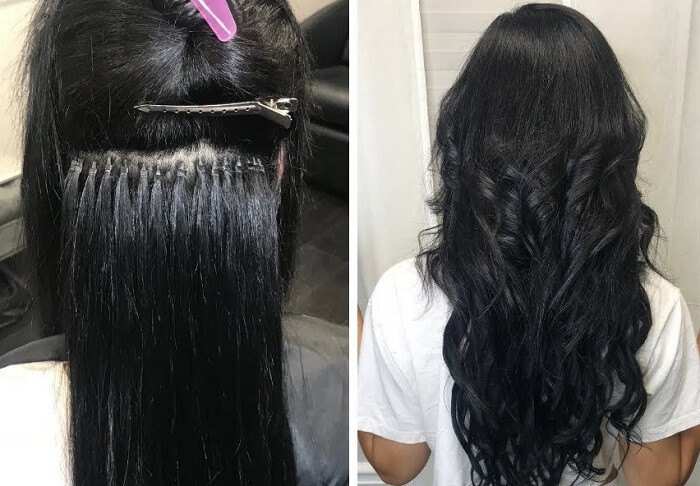
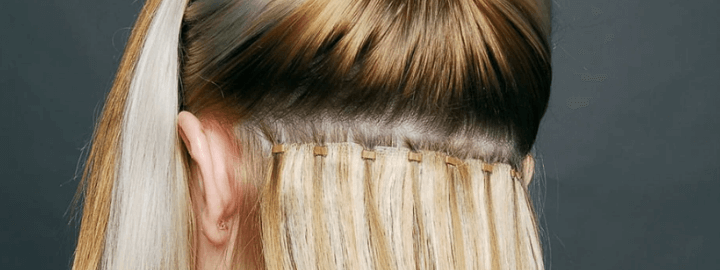
In this case, there’s no application of adhesives, clips, or tape. The hairstylist applies the use of fine micro-links or silicone beads at the base of the hair for convenient sew-in hair extensions.
Even though this technique requires skill, it’s worth noting that your hair gets full protection. You will not experience pain and tension due to hair pulling when braiding.
Similarly, you evade the troubles of loosening the tape adhesive or wig glue, which at times sticks to your hair and may pull it out.
Related article: 9 Best Tape-in Hair Extensions for Everyone

The Pros of Braidless Sew-in
Every woman views their hair as a super golden treasure. On that account, it’s important to comprehend the perks of braidless sew-ins. And further, analyze them to determine if they’ll work to benefit your own hair before choosing it as your next installation method.
Natural
Compared to the traditional braid sew-ins, the wefts of braidless sew-ins lie flatter on your hair and scalp. That’s since there are no braids underneath. This way, they tend to appear more natural.
Additionally, the braidless sew-in melds with your hair since your hair is unbraided and freely flowing from the scalp. This technique creates a nice blending such that the wefted extensions are undetectable.
Versatility
Wearing braidless sew-ins offers the ability to explore different styling ideas. If you style a bun or hair half up in a ponytail or a full ponytail today, you can do a high or low bun next time.
You can also change to a middle part or a side part with the extension tracks staying invisible.
Healthier
The application of braidless sew-ins does not involve braids or cornrows for anchoring the hair extensions. Hence it eliminates the possibilities of hair damage due to a pull effect on your hair and scalp for a comfortable feel.
Thus, your hair is safe from excessive breakage aggravating its potential for quick healthy growth. Trim out the split ends for much faster growth before installing the braidless sew-ins. [1]
At the same time, it involves no heat or chemical application, which makes the hair susceptible to breakage. These two substances easily cause a dry and brittle effect on your hair strands.
Any Hair Type
Braidless sew-ins go well with any hair type, whether fine or coarse hair. In fact, it’s more suitable for fine hair texture since it hardly stays long in braids.
However, that does not suggest coarse hair cannot look good in braidless sew-ins. It equally looks gorgeous and natural in braidless sew-ins.
Generally, it’s not a must for such hair to go with braid sew-ins just because it fits that.
Longevity
The good news about braidless sew-ins is that they last long, with an ideally long time in between salon maintenance appointments. Depending on how fast your hair grows, they usually stay as long as 6 to 10 weeks.
Quick to Install
Being that the hairstylist plaits no braids, the process is quite quick. It takes anything from 1 to 2 hours to install, nearly half the time installing for braid sew-ins.
Moreover, the retightening of the micro-links is simple and fast. In essence, it saves a lot of time and effort.

The Cons of Braidless Sew-in
It’s scary to put up with heavily-destructive and inconvenient hair installation techniques. But fortunately, braidless sew-ins pose very few downsides that are basically trivial.
Expensive
Sorry to disappoint you if you thought braidless sew-ins are cost-friendly. The installation cost ranges mostly between $150 to $600, which can even go higher up to $2000. It all depends on your hair type and location.
That installation cost may or may not include the price of the extensions. You may have to spend further on buying the extensions to be sewed.
Yet, the price of the wefted extensions lies anywhere from $80 to $650. Hence, the total costs might turn out unaffordable for some women.
Washing Method
The braidless sew-ins have some limitations when washing and cleansing them.
One thing, you cannot wash them frequently and vigorously as that will tamper with the tightness of the micro-links. The micro-links will keep loosening every wash day.
And the conditioner should be applied mid-shaft to the ends while maximally avoiding getting close to the micro-link at the hair root. If the conditioner comes in contact with the micro-links, they’ll slide out.
How to Install Braidless Sew-ins
The installation of braidless sew-ins depends on the volume and hair length you need. And since the micro-link insertion requires much hair expertise, DIY-ers can only install them if they’re professional.
But it’s good you know what tools are applied to your head. Also, what kind of installation your hairstylist does on your hair.
Sew-in Tools you Need
- Micro beads
- Loop Tool
- Curved needle
- Hair extensions plier
- Hair clips
- Nylon thread
- Rattail comb
Step-by-step Tutorial
STEP 1: Using the rat tail comb, section out the leave out around the head. That’s to ensure the extensions are optimally concealed for a natural look. And use the end of the rat tail comb to see if you can see it through the left-out hair at the back. If you can see it, then you have not left out enough hair.
STEP 2: Starting at the back, move to the point you want the extensions installed. And part the hair from side to side. Along that parting, lift out small hair, ensuring there’ll be little hair left above and beneath the extensions’ tracks. While doing so, clip up the hair above for maximum visibility of the parting.
STEP 3: Take the looper, and insert the micro-beads to the small hair portions lifted out along that parting, creating a row of micro-beads. Leave 1 to 1 ½ inch of space between the micro-beads to minimize damage during removal.
STEP 4: Push in the micro-beads using the hair pliers, but do not get them to the hair root. And tighten them so that they do not slide out.
STEP 5: Insert the nylon thread into the curved needle and stitch the extensions along the row of micro-beaded hair. The needle should go through the hair between the scalp and micro-bead. You can stitch another hair extensions’ weft for double volume.
STEP 6: Repeat step (2) to step (6) if you seek to add more hair bundles towards the front of the hair for greater volume.
STEP 7: Finally, brush through and straighten the whole hair for the extensions to blend in with the hair. Style however you want.
How to Maintain Braidless Sew-ins
If you’re looking to get the most out of braidless sew-ins, you must invest in the right maintenance routine. Here’s how to maintain them, check out this video:
STEP 1: Push in and retighten the micro-beads. The micro-beads must have gone down due to hair grow-out. And before you do that, master the art of using the hair pliers. Use the groovy end to squeeze them in to lie flat. And the circle-like middle part to get the beads back to the initial circular shape for easy movement of the micro-bead up and down on your hair.
STEP 2: Brush your hair to remove any tangles. That works to ease the washing process while passing your fingers through the hair strands.
STEP 3: Wash and cleanse. Lather in a good amount of your preferred moisturizing sulfate-free shampoo. Lift up the extensions’ tracks and finger-scrub the scalp gently along the rows. Once clean, rinse out the shampoo track by track and towel dry.
STEP 4: Apply a sulfate-free conditioner from the middle to the ends of the hair. Put the entire hair in a shower cap and leave the conditioner for at least 5 minutes.
STEP 5: Oil the hair strands lightly from mid-shaft to ends with a good hair serum. That’s for heat protection and smoothening the hair before blow-drying.
STEP 6: Blow-dry the hair root section at the partings until it’s completely dry. Use an extension brush to brush through the hair strands while blow-drying.
STEP 7: Trim out the ends if you want ponytail layers. Flip down the hair, tie using a hairband, and cut out the ends with scissors. Then remove the hairband, and trim if you need the length a little shorter.
FAQS about Braidless Sew-ins
How many hair bundles do I need for braidless sew-ins?
Braidless sew-ins require at least 1-2 hair bundles (packs) to pull up a natural look. However, that depends on the kind of volume you’re going for.
Which hair length is best for braidless sew-ins?
Opting for braidless sew-ins should be regardless of your hair length. There’s no such thing as braidless sew-ins blending with only long hair as it can with short hair.
The same way you install braidless sew-ins on medium to long hair is how you’ll do it on your short hair. Create some hair leaves out at least one inch from the hair perimeter. Section rows where you insert the micro-beads and stitch the hair extensions, and that’s it.
How long do Braidless Sew-ins last?
This styling method lasts for six to ten weeks if cared for properly. And after maintenance, they can last you more months before the microbeads need replacement.
Wrapping up
Going for braidless sew-ins is a good idea if you want nothing to do with braids, glue, or tape. Also, your hair does not go well with braids.
But before booking a salon appointment for an install, consult with a professional hairstylist to find what suits your hair best.
Related articles:
9 Best Headband Wigs for Your New Look


Tie your hair up and keep the rest of the hair sleek. Our braided wig with beads is made of good elastic nylon material, soft and breathable, comfortable to wear, and does not add any burden to your head. Capsize or head size is an essential part of the wig-making process. That’s why we strongly advise customers to use a measuring tape to measure the circumference of their head or ask someone to help measure the circumference of their head before ordering our wig.